The motherboard causes the LCD to display a black screen upon startup

A faulty mainboard is indeed the cause of a black screen when the industrial control LCD screen is turned on The mainboard of the industrial control screen (also known as the driver board or controller) serves as its "brain "
The mainboard failure causes the LCD industrial control screen to show a black screen when powered on
Motherboard failure is indeed a common and core reason for the black screen upon startup of industrial control LCD screens. Unlike consumer-grade displays, the motherboard (also known as the driver board or controller) of an industrial control screen serves as its "brain", responsible for all key functions such as power management, signal processing, and backlight control.
To systematically analyze and troubleshoot this issue, one can follow the following logic and steps:
Core analysis: How does a motherboard failure lead to a black screen
The mainboard failure of the industrial control screen may lead to a black screen through the following key paths:
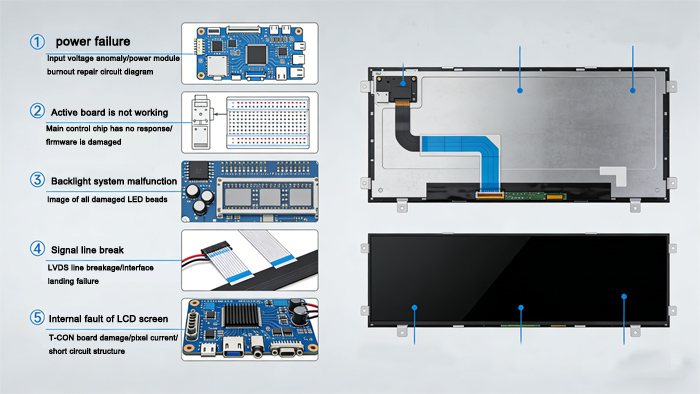
Backlight control circuit failure: This is one of the most common causes of a black screen. The backlight on/off signal on the motherboard or the backlight inverter/constant current drive circuit is damaged. The phenomenon is that the screen is powered on, the indicator lights may be normal, but a very dim image can be seen under strong oblique light (indicating that the liquid crystal layer is working, but the backlight is not on).
Image signal processing path interruption: The main chip (scaler), memory, or related circuits are faulty and unable to process the input signal. The phenomenon is that the indicator light is normal, the backlight may be on, but the screen does not display any image, showing a "gray screen" or "blue screen" state.
System power management failure: The DC-DC power conversion circuit on the motherboard is damaged, unable to provide the various voltages (such as 3.3V, 5V, 12V, etc.) required by the LCD panel, main chip, etc. This results in the entire system failing to start, and the indicator lights may be abnormal or not illuminated.
Program/Firmware Crash: The program stored in the Flash memory of the motherboard is corrupted (due to, for example, an abnormal power loss). This may manifest as no response when powered on, or the indicator lights flashing in a cycle (indicating an error code).
Physical damage to core components: The main chip, capacitors (especially electrolytic capacitors with bulging and leaking), voltage regulators, etc., are damaged due to long-term high temperatures, vibration, or electrical stress.
Gradually investigate the process
It is recommended to conduct troubleshooting in the order of "from the outside to the inside, and from simple to complex":
Step | Operation and checkpoint | Purpose and phenomenon analysis |
1. Basic Inspection | Confirm that the external power adapter/power cord is outputting normally (measure the voltage with a multimeter). Confirm that the signal cable (VGA/HDMI, etc.) is securely connected and undamaged. | Rule out the simplest issues related to external power supply and signal source. This is the first and crucial step. |
2. Observation and listening | After powering on, carefully observe the screen: look obliquely in a dark place to see if there is any extremely dark image. Listen for any high-frequency sound that may be emitted during backlight activation (unique to CCFL backlit screens). Observe the status of the indicator light: off, constantly on, flashing (the flashing pattern may indicate a fault code). | Determine whether the backlight is working and preliminarily locate the fault scope (power supply, backlight, or mainboard core). |
3. Voltage measurement | (Disassembly required, be careful) Use a multimeter to measure key test points on the motherboard: - Check if the input voltage (such as 12V/24V) is reaching the motherboard normally. - Check if there is voltage at the backlight power output (LED+/- or CCFL high voltage). - Check whether the output of each DC-DC circuit on the motherboard (such as 5V, 3.3V, 1.8V, etc.) is normal. | Locate the power failure point directly. If a certain circuit experiences voltage loss, the fault lies in the upstream circuit. |
4. Replacement and isolation | If conditions permit: - Replace the entire motherboard (of the same model). - Disconnect the connecting cable between the backlight driver board and the mainboard, and test the backlight separately (with caution). | This is the most direct verification method. If the issue is resolved after replacing the motherboard, then the original motherboard is faulty. |
5. Firmware and heat gun | (Operation by senior/maintenance personnel) - Try to reprogram the firmware (requires a programmer and firmware file). - Apply gentle heat (using a heat gun) to the main chip suspected of having poor soldering, to see if it can be temporarily restored. | Addressing issues related to poor soldering in software or BGA chips. If the device can operate briefly after being heated, but the fault reoccurs upon cooling, it is confirmed to be due to poor soldering. |
Special considerations in industrial control environment
Based on the usage scenarios of industrial control screens, motherboard failures are often related to the following factors. Please review them when troubleshooting:
Continuous high temperature: Is it installed in a sealed space or next to high-temperature equipment? Is the cooling fan stalled due to dust accumulation? Prolonged high temperatures are a killer to capacitors and chips, causing them to age.
Voltage instability: Is there a surge caused by the start-up and shutdown of high-power equipment in the on-site power grid? Consider installing a voltage regulator.
Vibration and dust: Continuous vibration may lead to cracking of solder joints, while dust accumulation can cause short circuits or poor heat dissipation.
Decision-making advice
Based on the investigation results, you can make the following decisions:
If you possess electronic repair skills and spare parts, you can attempt to replace bulging capacitors, burnt fuses, or voltage regulator chips on the motherboard. This is the least costly option, but it requires technical skills.
If the fault is clear and the motherboard supply is stable: the most reliable and quickest method is to purchase a replacement motherboard of the same model from the equipment manufacturer or the screen supplier. Simply replace it and resume production.
If the screen body is old, the motherboard has been discontinued, or there are no spare parts:
Consider seeking a third-party professional repair service to repair the motherboard.
Evaluate the cost-effectiveness of replacing the entire industrial control panel with a new one. The new panel may have advantages in terms of performance, power consumption, and reliability.
Summary: If the industrial control screen is black, there is a high probability of a motherboard failure. Please first perform basic troubleshooting by following [Steps 1 and 2]. If you confirm that the issue is with the motherboard and there are no repair conditions, contacting the original manufacturer or a reliable supplier for a motherboard replacement is the most reliable solution.
To help you make a more accurate judgment, could you please provide me with the following information?
1. After power-on, what is the status of the power indicator light (off/constant green/flashing/changing color)?
2. In a completely dark environment, is the screen completely black, or does it have a faint gray glow but no image?
3. Is the environment where this equipment is located particularly hot or dusty? Has there been any abnormal power outages or voltage fluctuations recently?
These details can greatly assist in narrowing down the scope of the malfunction.
TFT LCD:https://www.idtdisplay.com/
AUO LCD DISPLAY:https://www.idtdisplay.com/products/AUO_LCD_Displays/