Full Guide to Troubleshooting Industrial LCD Screen Flower Screen Malfunctions

Industrial LCD screens are the "eyes " of industrial equipment, human-machine interfaces, and automation systems Once display abnormalities such as flickering, stripes, and color blocks occur
Industrial LCD screens are the "eyes" of industrial equipment, human-machine interfaces, and automation systems. Once display abnormalities such as flickering, stripes, and color blocks occur, they can seriously affect operational judgment and production safety. In the face of screen malfunction, blindly replacing the screen is not only costly, but may also be unable to eradicate the problem. This article will guide you to establish a systematic troubleshooting process from simple to complex, from the outside in.
1.Initial judgment and preparation: Quick overview of flower screen types
Before starting, observe the phenomenon of screen distortion, which can provide you with preliminary direction:
Full screen pockmarks/snowflakes: Similar to the signal free state of an old-fashioned TV, usually related to the signal source or driver board.
Vertical/horizontal bright/dark lines: mostly caused by physical damage to the screen itself (LCD glass or bonding cable).
Local color block and V-shaped block anomalies: It is likely related to the screen driver chip or partition circuit.
Image ghosting and dragging: may be related to signal timing, grounding, or the response of the LCD itself.
Random flickering and intermittent screen flickering: usually related to poor contact of connecting cables or unstable power supply.
2. Six step systematic investigation method
Please operate strictly in the following order to avoid wasting effort.
Step 1: Basic inspection (5% of faults originate from this)
Restart the device: Turn off the device power, wait for one minute, and then restart. This can clear temporary software or driver errors.
Safety check: Ensure that all operations are carried out under power-off conditions to prevent electric shock or secondary damage.
Step 2: External signal source and connection troubleshooting (30% of faults are caused by this)
This is the most common and easily solvable link.
External display method:
Connect the video output of the host (such as VGA, HDMI) to another monitor that has been confirmed to be functioning properly.
If the external display is normal: the fault is 100% located in the industrial LCD screen itself, its internal driver board, or the connecting screen cable.
If the same screen is connected externally, the root cause of the fault lies in the signal output, graphics card, or driver program of the host (such as the HMI module of industrial control computer or PLC).
Check the video cable:
Re plug: Unplug both ends of the video cable (host end and screen end), check for bent or corroded pins, and then re plug them tightly.
Replace cable: Use a confirmed good cable of the same type for replacement testing. Internal cable breakage is one of the culprits causing intermittent screen flickering.
Adjust resolution and refresh rate: Enter the host system and set the display resolution and refresh rate to the optimal values specified by the LCD screen (e.g. 1024x768 @ 60Hz). Mismatched timing can cause screen distortion.
Step 3: Internal connection cable (screen cable) troubleshooting (25% of faults are caused by this)
If it is determined that the fault is on one side of the screen, first check the internal connections.
Power off unboxing: Open the back cover or shell of the display screen.
Check the screen cable: Find the flat ribbon cable (LVDS cable) that connects the motherboard (driver board) to the LCD glass.
Re plug: Carefully unplug the ribbon cable from the socket, check for oxidation and stains on the metal contacts, and then firmly plug it back in. Ensure that the lock buckle is fully fastened.
Observe the wire: Check for any obvious creases, damages, or pressure marks on the wiring.
Step 4: Troubleshooting of power supply and motherboard (driver board) (20% of faults are caused by this)
Power quality inspection:
Use a multimeter to measure whether the input voltage of the driver board is stable and meets the requirements (usually 12V or 24V). Low voltage or excessive ripple can cause unstable driving and result in screen distortion.
Check if the power adapter or internal power module is functioning properly.
Driver board inspection:
Observe the appearance: Check for any bulges or leaks in the capacitors on the motherboard.
Touch chip: After powering on for a moment, turn off the power and carefully touch the main control chip, LVDS transmission chip, etc. with your hand to feel if there are any abnormally hot components.
Firmware/Program: In rare cases, the MCU program on the driver board may run away. Try to completely power off and restart. If possible, consult the manufacturer for firmware updates.
Step 5: Troubleshooting the LCD screen itself (20% of faults are caused by this)
If all the above steps do not solve the problem, the fault is likely to lie in the screen itself, which is also the most expensive part of the repair cost.
Cross testing method (most reliable):
Find a confirmed good LCD screen assembly (including driver board) of the same model and replace it with your device. If the display is normal, it is diagnosed that the original screen is damaged.
On the contrary, install your problem screen onto a good device and reproduce the screen malfunction.
Fault diagnosis:
Appearance of bright/dark lines and V-shaped blocks: It can be basically determined that the transistor circuit or driver chip (such as Source Driver, Gate Driver) inside the liquid crystal glass substrate is damaged. Cannot be repaired, only the entire screen module can be replaced.
Uniform flower screen and color spots: It may be a malfunction of the timing control board (T-Con board) on the screen, but modern industrial screens often integrate it on the driver board or bind it to the screen body.
3.Environment and interference factors
At industrial sites, do not overlook the following factors:
Electromagnetic interference: Is the screen cable laid in parallel with the cables of high-power motors and frequency converters? Please use well shielded cables and separate the wiring.
Vibration and shock: Continuous vibration may cause the connector to loosen. Check if the equipment is securely fixed.
Temperature and humidity: Extreme temperatures (too high or too low) may affect the response and circuit stability of liquid crystal materials.
Summary: Troubleshooting flowchart
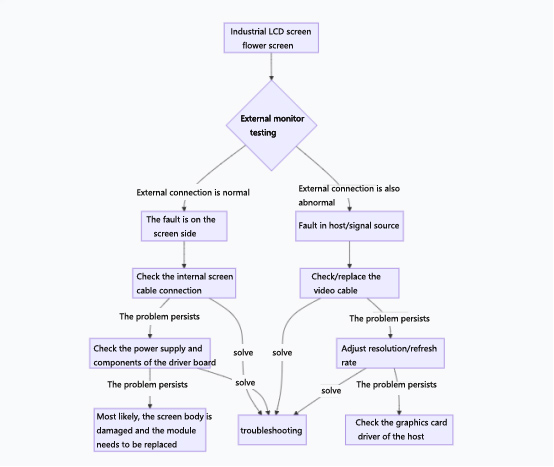
Safety reminder: If you do not have experience and skills in electronic maintenance, especially when it comes to internal disassembly and power measurement, please be sure to contact professional maintenance personnel or equipment suppliers.
AUO LCD DISPLAY:https://www.idtdisplay.com/products/AUO_LCD_Displays/